Portrait Poses: Principles Instead of a Pose Catalog
Weight, body angle, S-curve, chin, and hands with a job — plus a German-rooted direction-cue bank you can copy-paste. For workshops, non-professional models, and business headshots. Light and camera settings live separately in Portrait Photography Tips.
Author
Martin Kleinheinz
Photographer · Content Creator · Hannover
Updated
July 19, 2026
Most pose articles hand you ten photos and say: "Stand like this." At your next shoot with a non-professional model, that falls apart immediately. The person stands stiff, the hands search for something to do, the gaze drifts somewhere — and you're mentally flipping through a catalog nobody can memorize.
I work differently: principles instead of a pose catalog. When weight, angle, line, chin, gaze, and hands are right, the pose builds itself. That holds for workshops, business headshots, and content days just as much as for friends in front of the camera.
One note on scope: light, aperture, and camera settings are covered in Portrait Photography Tips. This article goes deep on posture and direction — inclusive, without "poses for men / poses for women," with a cue bank you can lift word for word.
00
Quick
Quick Start: 6 Checks Before You Shoot
Before you fine-tune anything: run through the list once. It takes ten seconds — and often saves ten stiff frames.
1. Weight
Shift onto one leg / one side of the hips. Both legs evenly loaded = a stiff base.
2. Body angle
Torso and hips at 30–45° to the camera — not straight-on like a passport photo, unless it's a deliberate headshot look.
3. S-curve / line
Hips one direction, shoulders slightly opposing. A straight plank facing the camera looks rigid.
4. Shoulders + chin
Drop the shoulders softly. Chin slightly forward-and-down (the "turtle" move) — never pull the chin up.
5. Gaze
Eyes follow the direction of the nose. Gaze and nose disconnected = restless.
6. Hands
Every hand needs a job: fabric, table edge, cup, jacket, pocket (thumb out).
01
Fundamentals
Principles: Why a Pose Works
A good portrait pose isn't a rigid figure. It's a clear line with soft transitions. The table below shows the levers — then the S-curve as an image.
Principle
What You Want
Typical Mistake
Quick Fix
Weight
One standing leg, a relaxed free leg
Both legs locked, hips blocked
"Shift your weight to the left/right"
Body angle
30–45° to the camera
Straight-on with a wide shoulder front
Turn the feet, then rotate the torso slightly back
S-curve
Hips and shoulders opposing
Straight plank / military posture
Hip out, opposite shoulder slightly forward
Shoulders
Soft, one possibly closer to the camera
Raised, tense
Inhale → shoulders up → exhale and drop
Chin (turtle)
Slightly forward and a touch down
Chin up / head tilted back
"Push your chin a notch toward the camera"
Gaze
Eyes in line with the nose
Eyes sideways, nose frontal
Turn the head, then let the eyes settle
Hands
With a task, fingers soft
Fists, dead hands at the sides
Give an object or a contact point
Seven principles — apply to every body type, every gender, every outfit
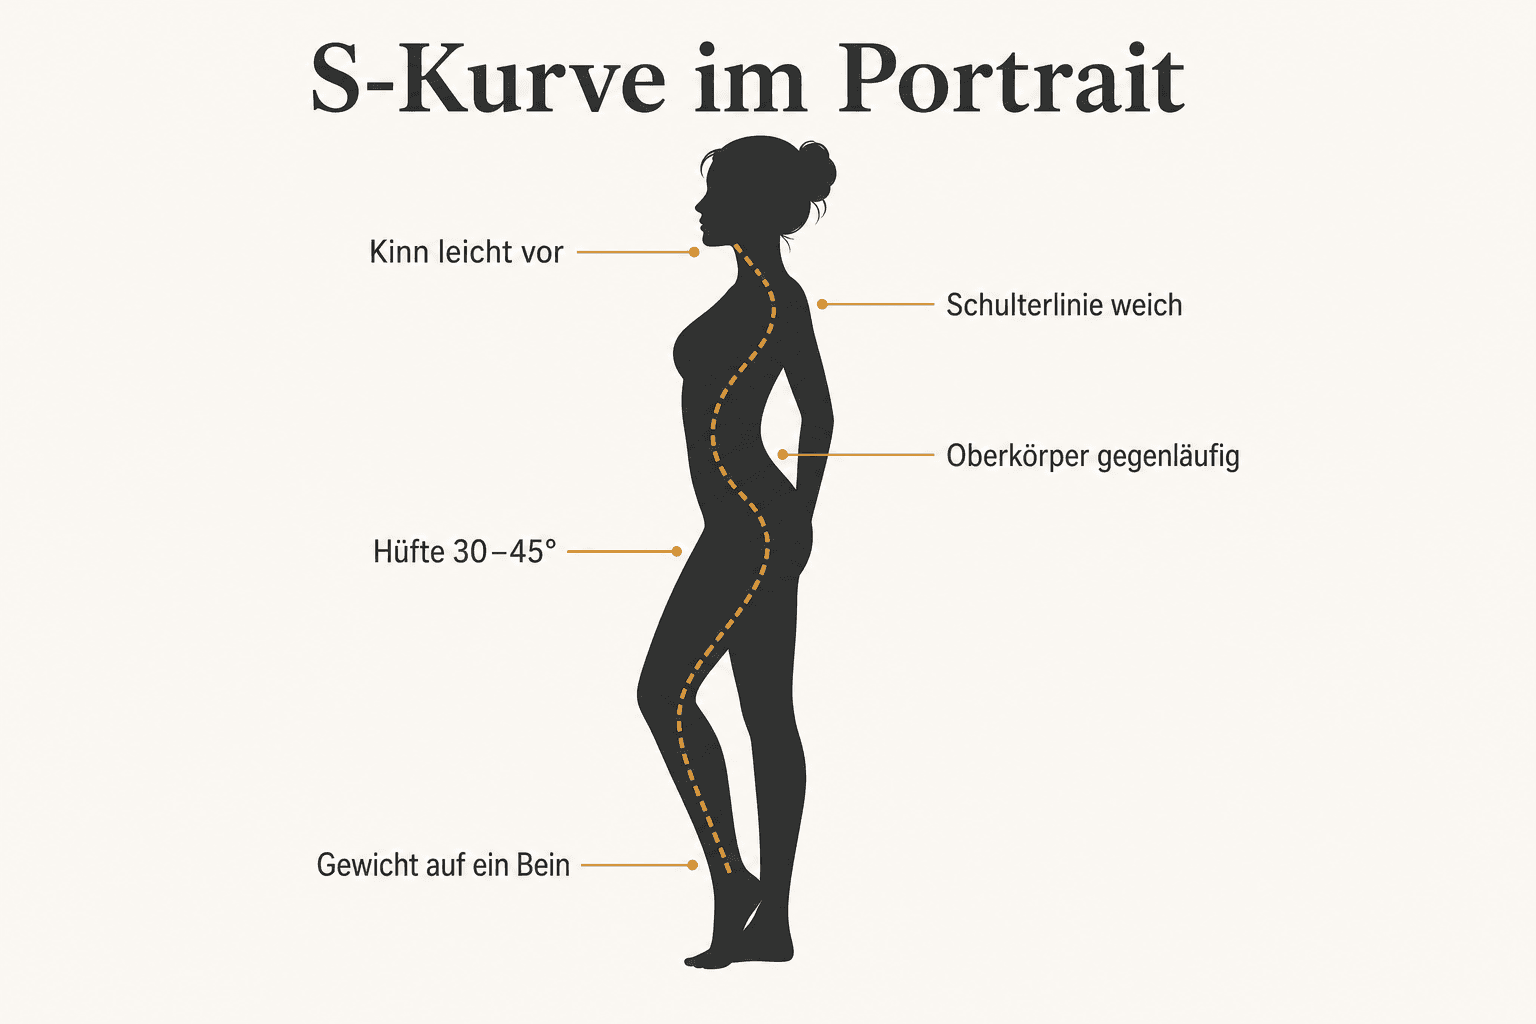
The S-Curve: the Line That Brings Calm
The S-curve appears when weight shifts onto one leg, the hips tip slightly, and the torso counters it. Don't overdo it into a dance move — a visible, calm bend is enough. Straight-on and symmetrical often reads as a "passport-office pose"; the slight curve feels alive.
S-curve — weight on one leg, hips and shoulders opposing, chin slightly forward
For the overview on light and focal length, Photographing Portraits remains the starting point. Here the focus stays on the body in front of the camera.
◆ Lightroom PresetsBundle
Photos with film character
9 Lightroom presets inspired by Portra, Kodak, Fuji & Ilford — for street, portrait and landscape. One-time €29, no subscription.
Non-professional models need concrete verbs, not photography jargon. Below is a bank of lines I actually use on set — translated directly from the German I speak with clients in Hannover. Short, friendly, repeatable.
Body & Stance
◆"Shift your weight completely onto your right leg."
◆"Bend your free leg slightly — let the toes just tap the ground."
◆"Turn your feet about 40 degrees to the side, then bring your torso back toward the camera a touch."
◆"Hips a bit to the left, right shoulder forward just slightly."
◆"Imagine you're leaning against an invisible wall — but stay upright."
◆"Make yourself a notch taller — crown toward the ceiling, without lifting your chin."
Head, Chin, Gaze
◆"Push your chin a notch toward the camera — like a curious turtle." (In German, I just say: „Schildkröte.“)
◆"Don't lift your chin. Tilt it slightly down and forward instead."
◆"Turn your head with your nose — the eyes will follow on their own."
◆"Look exactly where the tip of your nose points."
◆"Soften your gaze: imagine you're looking through the lens, not at it."
◆"Relax your lips a little — don't force a fixed smile."
Hands & Contact
◆"Give the hand a job: lapel, cup, table edge, pocket."
◆"Fingers soft — no fist, no spread-out spider hand."
◆"Only the fingertips touch the fabric, not the whole palm."
◆"Thumb out of the pocket, the rest of the hand stays in."
◆"Let the wrist bend slightly — not stiff like a ruler."
Energy & Timing
◆"Breathe in — shoulders up — breathe out and let them drop. Hold that."
◆"Take three steps, stop on the fourth and just stand."
◆"Tell me quickly what you did this morning — and stay in position."
◆"Laughing is allowed. We'll take the frame right after, once it settles again."
◆"Perfect, just like that — hold for two more seconds."
03
Practice
Standing, Sitting, Leaning, Walking
Same principles — different starting position. Build situations, not new catalogs. For location and series ideas, see Photoshoot Ideas.
Standing
The default for most outdoor and studio portraits. Weight on one leg, 30–45° angle, a subtle S-curve. The front shoulder often sits a touch closer to the camera — that narrows the silhouette and opens up the frame.
Variant A — Calm
Hands: one on the lapel / belt, or lightly touching the opposite arm. Gaze at the camera or just past it.
Variant B — Active
Let the weight shift, freeze mid-step. Avoid motion blur: cue "Stop — hold."
Sitting
Chair or stool: don't sit centered like a throne. Sit on the front edge of the seat, one foot slightly forward, torso leaning a touch toward the camera — that shortens the back and prevents "sinking backward." Don't press elbows onto the thighs, or the shoulders round forward.
◆"Sit on the front edge, not into the backrest."
◆"One foot closer to the camera, the other slightly back."
◆"Keep your torso long, like you're following a conversation."
Leaning
Wall, doorframe, railing: choose a clear contact point. Shoulder or hip touches — not the whole back pressed flat. That keeps the S-curve and avoids the "glued on" feeling. Hands on the frame or in pockets, with a job.
Walking
Walking is the best stiffness-killer. Ask for slow steps toward a marked spot, and trigger the shutter the moment a foot touches down. Cue: "Three steps — on the third, stop and look at me." For fast series: keep walking continuously, and you pick the frame.
04
Business & Closeness
Headshots, Business, and Brief Couple Moments
Headshots & Business
Here, clarity matters more than drama. The body sits closer to straight-on — but not stiff: a touch of angle in the shoulders, turtle chin, calm gaze. Hands usually stay outside the frame; if visible, give them a job (table, folder, jacket button).
LinkedIn / Website
Soft shoulders, a slight smile or a calm neutral gaze — depending on industry. More context: Profile Picture Guide.
Dark background
Posture stays the same — lighting and distance from the background decide the sense of depth. See Black Background for Photos.
Standing vs. sitting
Standing: a leaner impression. Sitting on the edge of a table: approachable, good for consulting-type roles. Never sink deep into the backrest.
Couples — Brief and Honest
No wedding-style pose marathon. For portraits and content, a few clear connections are enough: shoulder to shoulder, one hand on the other's arm, forehead to forehead, a shared point of focus. One anchor point often carries more than a full-body embrace.
◆"Stand close enough that your outer shoulders form one line."
◆"One hand finds the other's elbow or shoulder — softly."
◆"Both look at each other first, then together toward the camera."
◆"Weight on the outer leg each — you open up toward the middle."
Lightroom Presets9 film looks inspired by Portra, Kodak & Fuji —View pack →
05
Avoid
Mistakes That Cause Stiffness — and How to Save the Hands
Stiffness rarely comes from "the wrong pose number seven." It comes from blocked principles. The most common patterns:
Symptom
Cause
Immediate Fix
Plank in front of the camera
Weight on both legs + straight-on
Shift weight, turn 30–45°
Raised shoulders
Tension / cold / insecurity
Up-down breathing, check the jacket
Double-chin fear → head tilts back
Chin up instead of forward
Turtle move: chin forward-and-down
Dead hands
No job, fingers tense
Object or contact point
Eyes wandering
Gaze ≠ nose direction
Turn the head, let the eyes follow
Smile mask
"Say cheese" without emotion
Conversation / a real pause / a small laugh
Symptom → cause → cue — this keeps you capable of acting on set
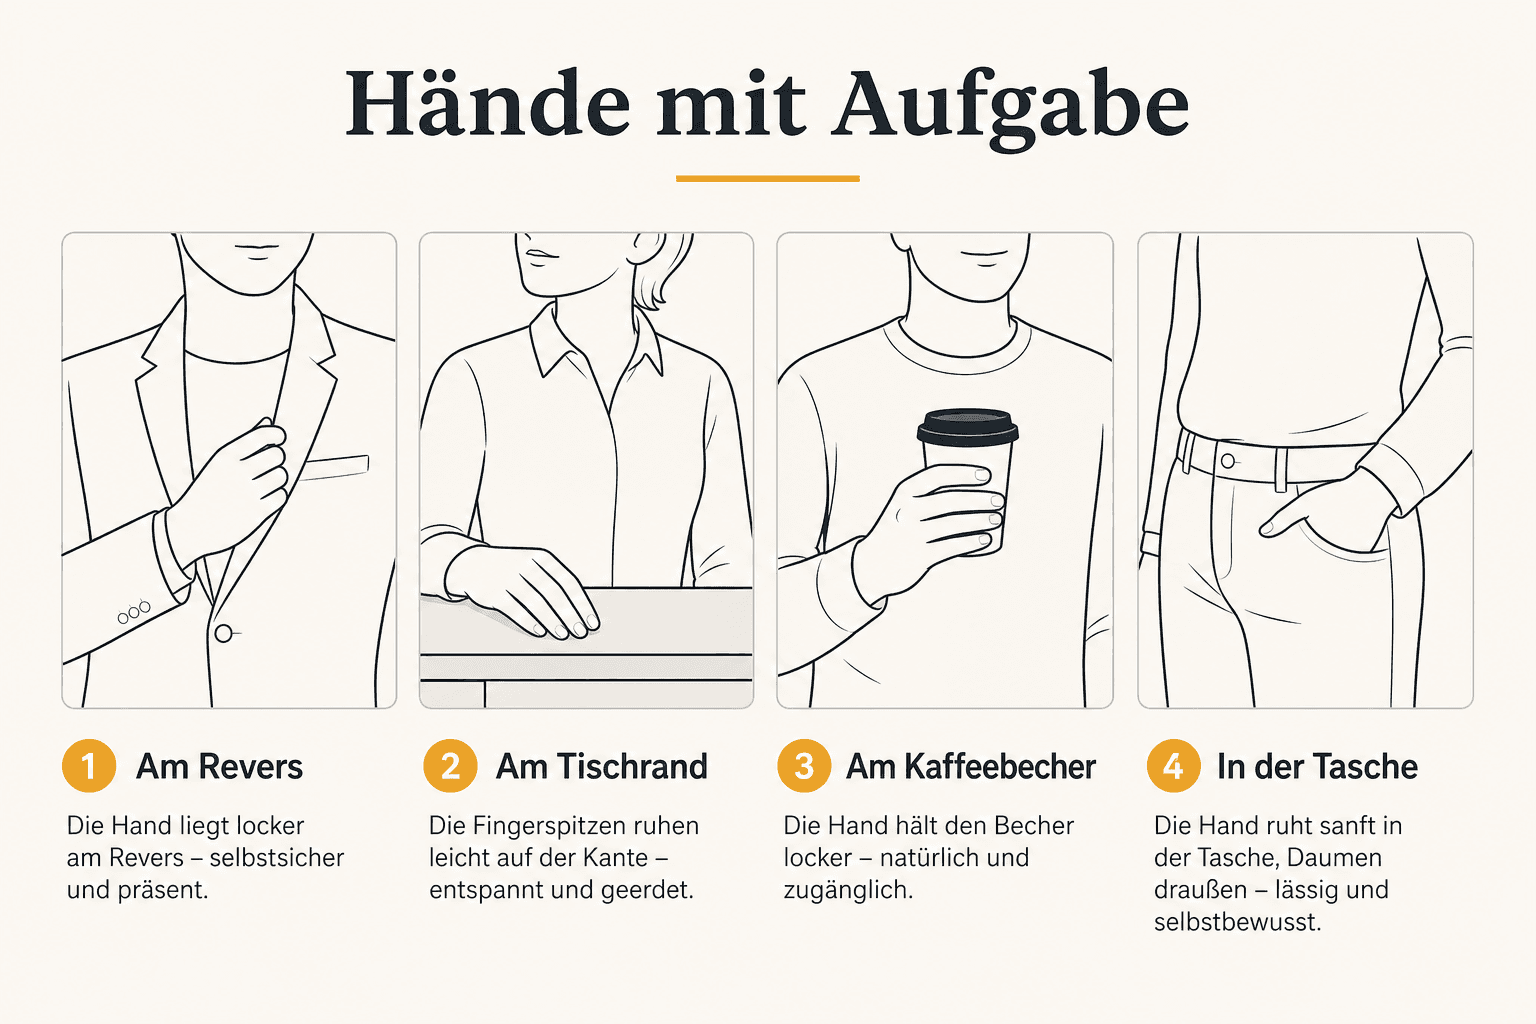
Hands: Always With a Task
Hands reveal insecurity first. Give them work — even in the tightest headshot crop, by deliberately leaving them out. In half-body shots, a job is mandatory:
Hands with a job — lapel, edge, an object, or a pocket (thumb out)
06
Protocol
Reset for Stiffness: Under 60 Seconds
When the energy is gone: stop correcting. Reset. Then rebuild. The protocol works the same in workshops and with business clients.
1. Camera down
Eye off the viewfinder. A small joke or a factual question — takes the pressure off.
2. Shake it out
"Shake out your arms, loosen the jaw, two deep breaths."
3. Walk
Four steps away from the mark, come back, stand anew.
4. One principle
Set only the weight. Ignore the rest. Take the frame. Then add the angle.
5. Mirror the success
Specific praise: "Now the shoulder is soft — let's keep that."
“Stiffness isn't a character flaw. It's a missing task for the body and mind. Give both a job — and the pose comes back.”
07
Flow
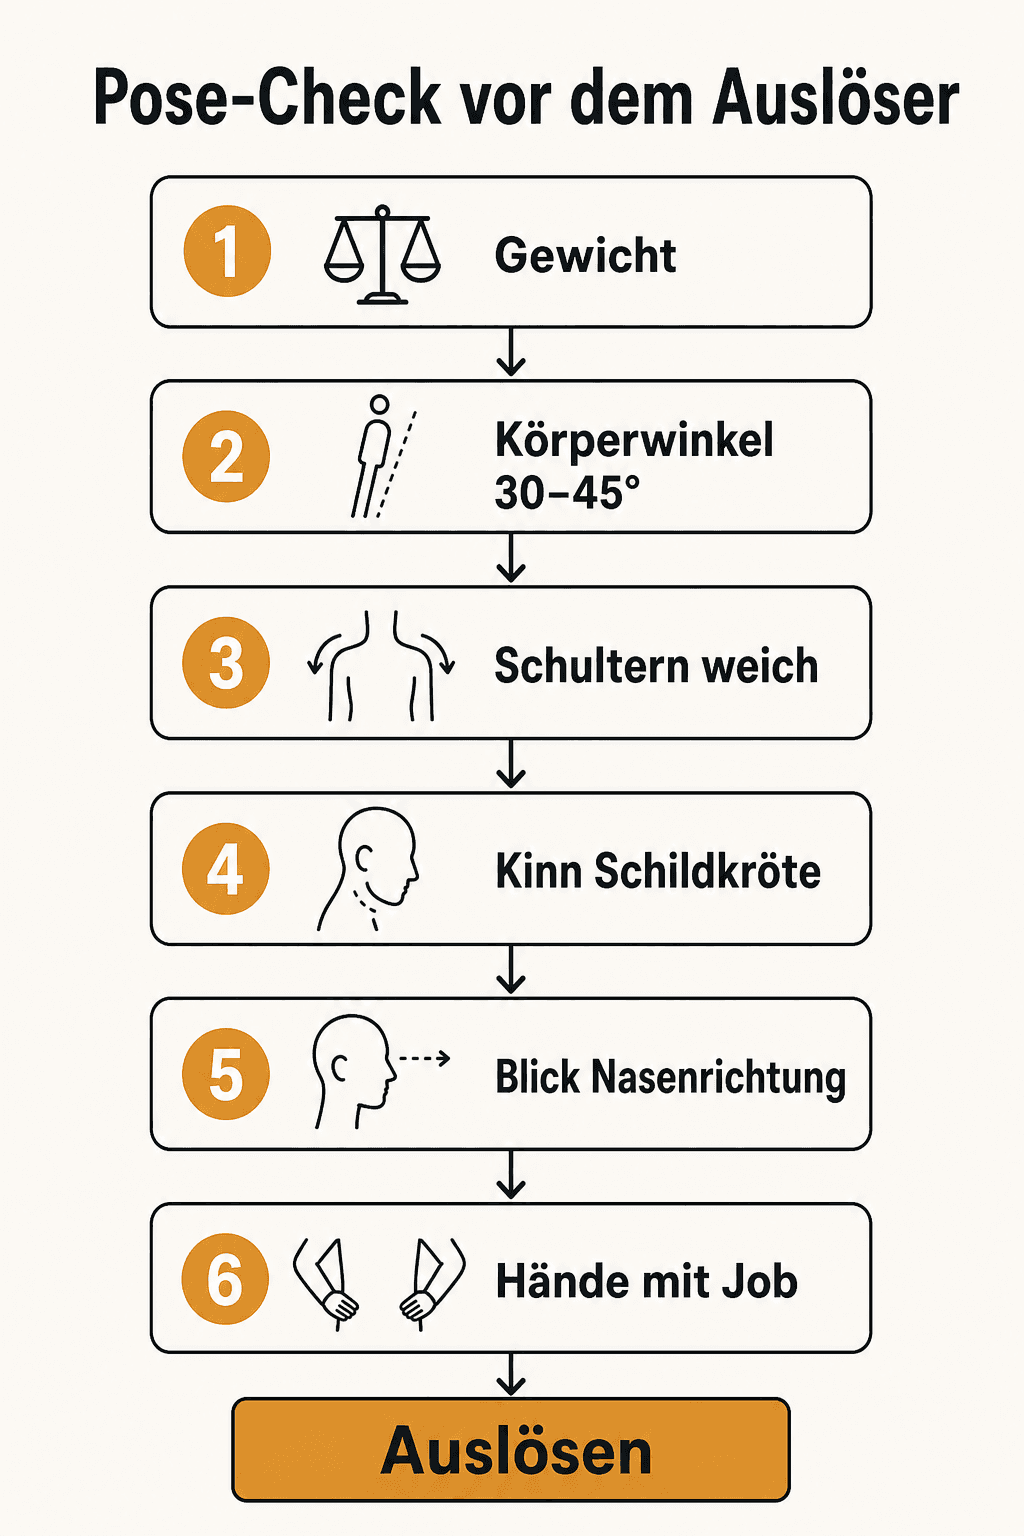
Checklist Flowchart Before You Shoot
When you're under time pressure (an event corner, a workshop rotation, a LinkedIn marathon), use the flow as a mental loop — not a rigid ritual.
Pose check — six stops, then shoot; if it's a no, take one step back
Rule of thumb: if two checks are off, don't fine-tune — run the reset protocol. One check off: one cue, one frame, move on.
08
Optional
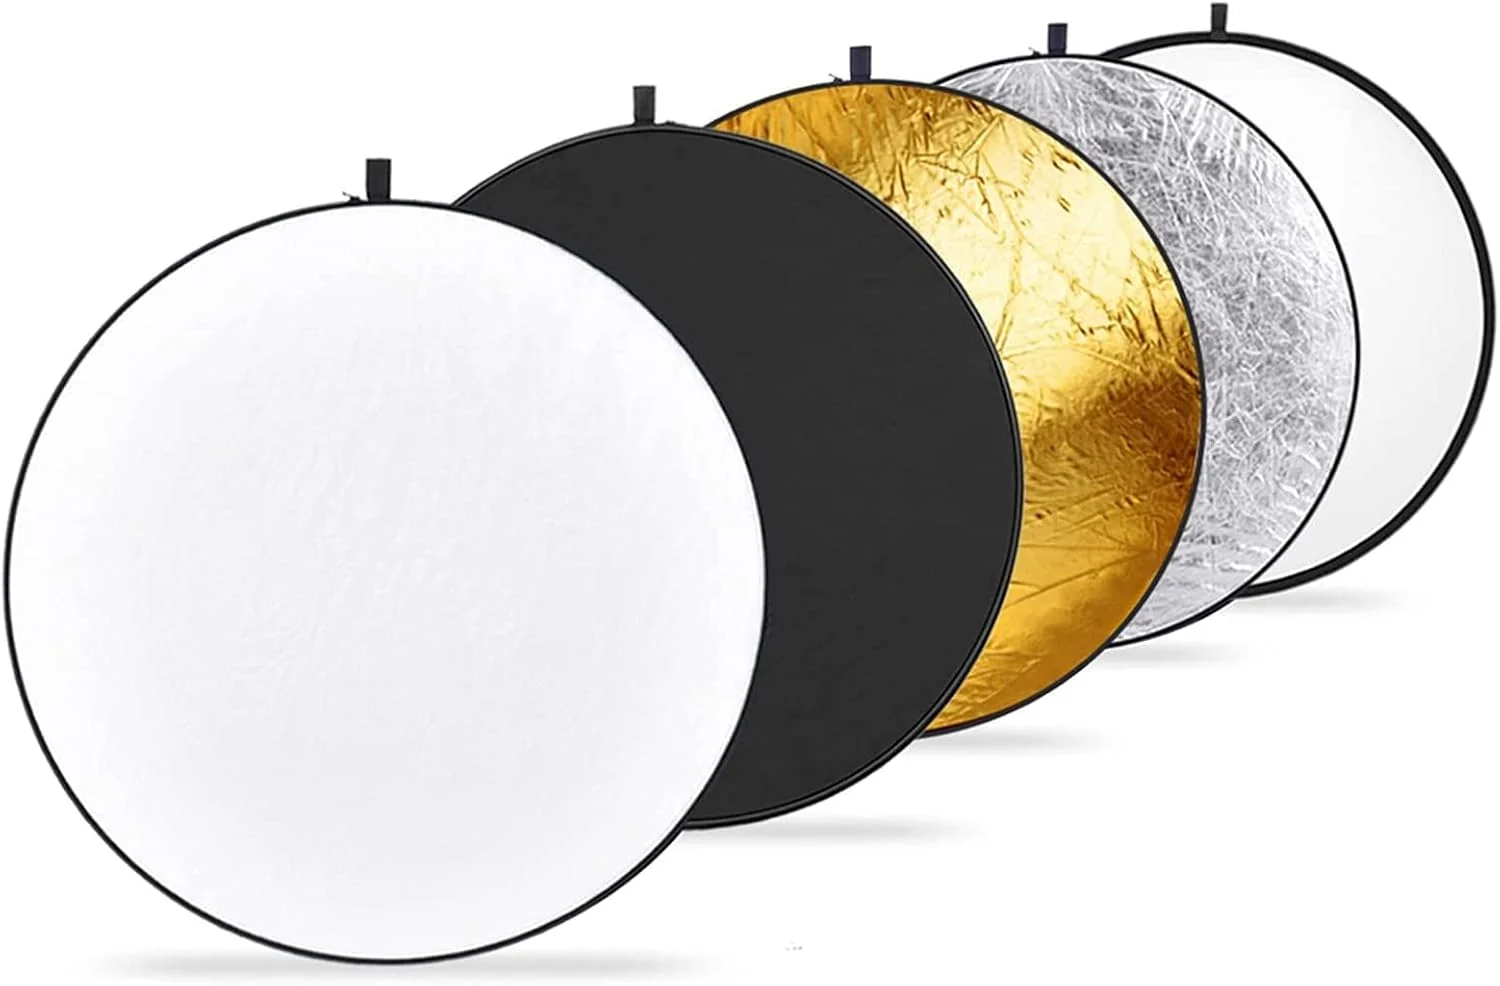
Optional: A 5-in-1 Reflector for Softer Portraits
Poses look better when the light on the face cooperates. A foldable 5-in-1 reflector (diffuser plus silver / gold / white / black) isn't a required purchase — but it's the cheapest lever for filling in hard shadows under the eyes and chin while you're directing posture.
Verdict: For window light and outdoor portraits, the 110 cm Neewer (or a comparable model) pays off. White = gentle fill, silver = more punch, gold = warmer (use sparingly), black = contrast/flag, diffuser = softens harsh sun. An assistant or a stand holds it — you keep your hands on the camera and on directing.
Optional
Light Support on Set
Just one product — because posture comes first. The reflector supports, but doesn't replace, clear cues.
Vergleich
Neewer
Neewer 5-in-1 Reflector 110 cm
Bild
Empfehlung
Optional
Sensor
5-in-1 folding reflector
ISO-Bereich
approx. 110 cm dia.
Autofokus
Diffuser · Silver · Gold · White · Black
Detail
Portrait · window light · outdoor
Stärken
+Five lighting functions in one foldable piece
+White for gentle fill, silver for more contrast
+Diffuser softens harsh sun
+Compact enough to bring on location
Schwächen
−Needs a second person or a stand in the wind
−Gold turns warm quickly — use it sparingly
−Doesn't replace a proper studio lighting setup
Geeignet für
Portrait and content shoots with window or sunlight, when you want to fill shadows in a targeted way.
A foldable 5-in-1 reflector at roughly 110 cm: translucent diffuser plus a cover in silver, gold, white, and black. For window-light and outdoor portraits when you want to fill shadows under the eyes and chin or soften harsh sun — while you keep directing posture and gaze. Typically in the low double-digit dollar range. An assistant, clamp, or stand holds it; you stay focused on the camera and direction.
Direct Principles — You'll Forget the Catalogs Anyway
Good portrait poses don't come from memorized silhouettes. They come from weight, angle, line, chin, gaze, and hands lining up — and from being able to say clearly, in plain language, what you need.
Take the six checks before you shoot, the cue bank on your phone, and the reset protocol for the moment everything stalls. You don't need gender boxes: you control intensity and character by how strongly you apply the principles — not through separate pose worlds.
10
FAQ
Common Questions About Portrait Poses
What are the most important portrait poses for beginners?+
Don't memorize individual poses — use six checks: weight on one leg, 30–45° angle, a subtle S-curve, soft shoulders, chin slightly forward-and-down, hands with a task. Standing, sitting, and leaning variants build themselves from there.
How do I direct non-professional models without confusing them?+
One instruction per sentence, concrete verbs ("weight on your right leg," "chin toward the camera"), followed by specific praise for what's working. Too many corrections in a row cause stiffness — then reset: shake it out, walk, rebuild.
What is the S-curve in portraiture?+
A soft body line: weight on one leg, hips tipped slightly, shoulders slightly opposing. It reads as more alive than a straight, symmetrical plank facing the camera head-on.
How do I avoid stiff hands in photos?+
Give every hand a job: lapel, table edge, cup, pocket with the thumb out. Fingers soft, minimal surface contact. Without a task, hands look dead or clenched.
Are there different poses for men and women?+
Not as a separate system. The same principles apply to everyone. You vary intensity (a stronger or softer bend, more or less shoulder toward the camera) based on outfit, assignment, and personality — not gender.
How do I pose for business headshots?+
Closer to straight-on, but with soft shoulders and a turtle chin. A calm gaze in the direction of the nose. Hands often stay outside the frame. More on framing: Profile Picture Guide.
What do I do when the model completely freezes up?+
Camera down, shake it out, let them walk briefly, reset just one principle (usually weight). Specific praise as soon as something clicks. Don't keep fine-tuning while tension is still high.
What body angle to the camera is ideal?+
For most full- and half-body portraits, roughly 30–45°. Pure straight-on often looks wider and stiffer — unless you deliberately want the direct headshot look.
Do I need a reflector for good portrait poses?+
No. Posture and direction come first. A 5-in-1 reflector optionally helps fill shadows under the eyes/chin in hard light — it doesn't replace clear cues.
Where do I find tips on light and camera settings?+
In Portrait Photography Tips (light, aperture, focus) and in the overview Photographing Portraits. This article deliberately stays focused on posture and direction.
From my workflow
35mm & 120mm film presets
Portra, Kodak Gold, Velvia, HP5 & more — ready-made XMP presets for Lightroom Classic and mobile.
Affiliate links marked with * — Amazon product links use partner ID martinkleinhe-20. I earn a small commission if you buy through these links; there's no extra cost to you. The recommendations are based on hands-on practice — no brand sponsored this article.
◆ Newsletter
Stay in the loop.
Camera and photography news, honest gear tests and new articles — in your inbox. Infrequent but relevant. No spam, unsubscribe anytime.